Have you ever wondered a way to turn incoming caller name or number into “Voice Caller ID”? or If you wish to know caller name or number without seeing your Phone’s display then this guide will be most pertinent to you.
If you are an Android phone user, then you can make your phone read out caller name or number when you are receiving incoming calls, without using any applications. However, there are the bunch of apps on the Google play store to “speak caller name.” And we can get some advanced features by using a third-party app that we can’t find on Android built-in feature. I have covered both ways in this article.
Let’s take a look at how we can make our Android phone talking caller ID name and number during we receiving an incoming call.
Turn caller name or number into “Voice Caller ID” using “Who’s Calling” app.
“Who’s Calling” is a free Android application which announces caller name or number while we receive a call. As well as this app can read SMS messages and app notifications such as notification of WhatsApp, Viber, Telegram, Skype or any other app.
And this app offers many features about speaking caller name like Support unsaved numbers, mute announcing for selected numbers, configure volume relative to ringtone volume, quiet reading by flipping the phone, able to set a number of times it repeats the caller ID and so on.
This app uses your phone’s Text to speak engine to announce caller name. Consequently, make sure if “voice data” in Text to speak engine has installed on your phone. And I highly recommended you to integrate your Android Phone’s TTS engine with Google’s Text to speak engine for Android.
How to download and use Who’s calling “Voice Caller ID” app.
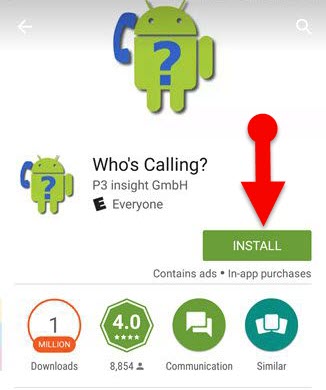
Step 1: Download and open the “Who’s calling” app using this link. (When you first launch the app, it will show a welcome note in a pop-up window.)
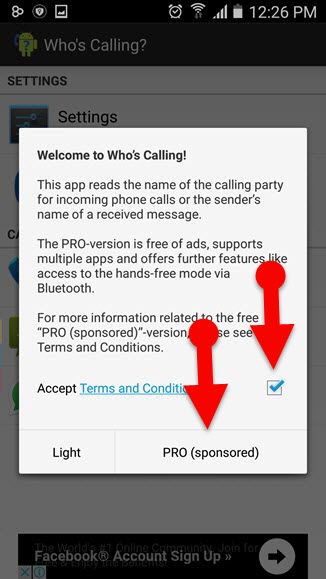
Step 2: Now select the checkbox that next to “Accept terms & conditions” and tap “PRO (sponsored)” button at the bottom right corner of the pop-up window.
Step 3: By the default, the app will enable automatically, if not then turn on the button at the top right corner of the app.
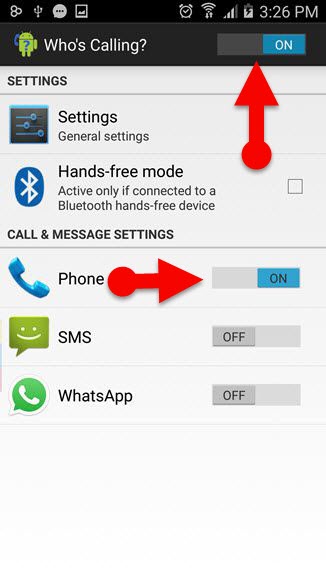
Step 4: Then, turn on the button next to “Phone.”
That’s it. Now your phone will announce caller name or number whenever you are receiving a call.
Android’s built-in feature to “Voice Caller ID.”
Google’s Android operating system is a most popular operating system for smartphones. Which offers to get the number of features to their users without using third-party applications such as call blocking, Flashlight, block notifications for a specific app and much more. Likewise, Android OS also offers to know caller ID via voice. We can access this feature through following instructions.
How to access “Voice Caller ID” feature in Android
![]()
Step 1: Go to settings in your Phone.
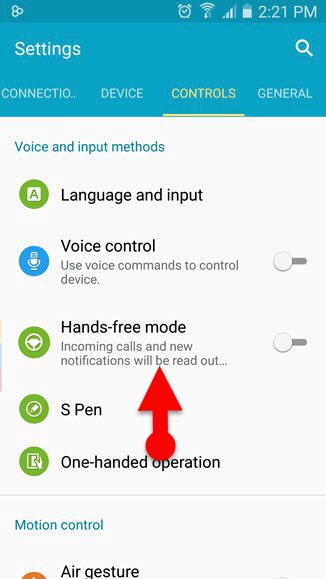
Step 2: Then navigate to Controls > Hands-free mode.
Step 3: Now turn on the button, next to the “Hands-free mode” at the top right corner of the page.
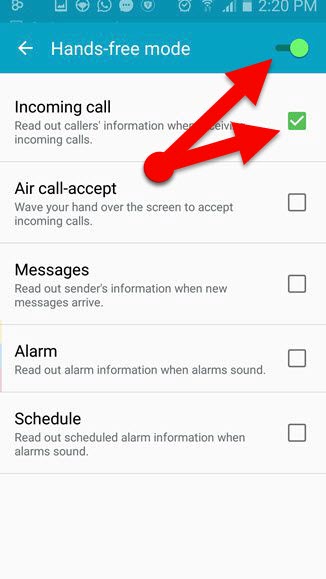
Step 4: Select the “Incoming call” checkbox and remove tick marks from other checkboxes.
Step 5: That’s all, now your phone will read out caller’s name when you are receiving incoming calls.
Note: I have used Android Lollipop installed Samsung Galaxy phone to demonstrate this article. However, above settings could differ according to your Phone manufacturers and version of Android.
Closing words: Caller name speaker with an app and without an app
This article explains all about the “way to announce caller name or number during you receiving an incoming call on your Phone.” Personally, I like to use the first method because which allows getting some cool features about announcing caller ID such as the mute speaking function for specific contacts, mute speak function for unknown contacts, simply enable/disable “Voice Caller ID” function and so on. I think this article will help you to make your another work easy. If you have any queries related to this article, then just leave a comment below.